View Post

Oracle MAX: Building my first application (Part 2): Application development

In the last release of Oracle Mobile Cloud Service, Oracle Mobile Application Accelerator (Oracle MAX) and Location Services were released. In my first technical post about MCS 2.0 I am going to focus on Oracle MAX, the new tool that allows us to create applications without coding, and that will enable business users, and people that doesn’t know about programming, to build applications easily.

This is a 2 part post where you can find:

In the first part of this post we built a Custom API that we will consume from Oracle MAX.

In order to access Oracle MAX, In Oracle MCS applications menu, we have to click on Mobile Applications.

If we want to allow a business user to access Oracle MAX we need to asign them MobileEnvironment_BusinessUser role. Any other user should not have this role as it will not be allowed to access Oracle MCS itself.

This is what we will see the first time we log into Oracle MAX. As we don’t have any application, we can just create a new one.

Once we click on New Application, we will see the first wizard. We have to set the name of the application. This is the name that we will see in our device.

The next step is to define the layout among the predefined ones.

In the next step we are going to set a name to that screen, in this case it will be Posts.

The last step is to define wat we want to see in that screen. we can choose from empty screen (we will be able to add any component), list, form and dashboard.
We are going to pick list in this example.

Once we have finished the wizard, we can see that our screen is based on what we selected in the last step of the wizard, and now we can make some actions on it that we can see on the right hand side of the page.

We are going to start with Add Data. This will allow us to associate data to the list component.

In this step we just have to click on Add Service and look for the API we want to consume.

After we have selected the API, we can choose the business object that we proviously created. This appears as we create getPosts schema.

We have to drag and drop the desired fields into the list items. We can see a preview by clicking on the button. 

After associating the data to a component, we will see a menu on the left where we can choose user, evironment information, or setting a fixed value to set as query parameter if the endpoint we are consuming has a parameter,

We have just finished our first screen.
Now we are going to add a detailt screen were we will be able to check the information on a single post.

In we click on Add a Detail Screen  we will see a wizard like the one we filled when creating the first screen.
After that we will see this page, this is the designer page where we can do:
  • Add Components: we can choose lists, forms, charts, etc.
  • Add Actions: we can define actions and add gestures to our page.
  • Modify properties

How we develop the second screen? Well this is easy, just follow the wizards as we did with the first screen.

Once we have finished the application we can deploy it to our device (the second button) or test it right in the browser (the first button).
If you want a user to deploy the applications you need to set that use ‘Max Application Deploy’ role.

If we click on deploy button, Oracle MAX will start building our application and once it is finished we can see the QR code to download the application.

In order to install the application in our devices we need to have installed Oracle MAX application.
It can be downloaded from Google Play Store or Apple App Store.
This is what Oracle MAX application looks like.
We can click on Edit button to remove the existing aplications or click on add button to add our Oracle MAX applications.
Once we have added our application, scanning the QR code, we will see the posts lists.

And the post detail if we tap in the post.

View Post

Oracle MAX: Building my first application (Part 1): Custom API design

In the last release of Oracle Mobile Cloud Service, Oracle Mobile Application Accelerator (Oracle MAX) and Location Services were released. In my first technical post about MCS 2.0 I am going to focus on Oracle MAX, the new tool that allows us to create applications without coding, and that will enable business users, and people that doesn’t know about programming, to build applications easily.

This is a 2 part post where you can find:

Before that any user can create an application we have to design correctly our Custom API.

Oracle MAX uses business object, so first we need to define schemas for the endpoints.

In this quick example, in our Custom API we are going to have 2 endpoints

/posts that will return a list of all posts, and
/post/id that will give us the information of the post.

Now that we have our endpoints create we have to create schemas for them.
In the left hand side menu, we have to click on ‘Schema’, and if we don’t have any schema yet, click on ‘New Schema’ button.
The first one is Post schema.
This is the base schema for the post object. Now we need to create a schema for every endpoint. 
For /posts endpints we will have getPosts


And for /posts/id endpoints we are going to create getPost schema.
The first step is completed. Now we need to associate the schema to each endpoints and create Mock Data in the responses to each endpoint.
At the moment it is mandatory, and if you don’t have mock data you will not be able to create lists in the application. I would like to thanks Denis Tyrell and Laura Akel for their help with this issue.
For each endpoint we have to click on methods.
Then in responses we have to select the schema that corresponds to the endpoint by adding new Media Type.
And also adding mock data in examples tab.
Our first endpoints is finished, and our second endpoints will looks like:

The last step is to publish the API, because we will not be able to consume it if it is not published.
In API menu, right click on the desired API and click on Publish.
I am not going to implement the APIs as you cna check other posts like Post 1, Post 2, Post 3 or OTN Article. Implementation and design should be done by someone with development skills,
In the next post we will build the application itself and this step can be done by anyone, as the application development is based on wizards and we don’t have to write any line of code.
    View Post

    Oracle MCS: Creating PDF files in Custom APIs

    Oracle Mobile Cloud Service allows you to implement Custom API using node.js. This is a powerful feature as it allows you to use any of the existing node.js modules in your implementation.

    In this post I am going to show you how to create and download a PDF file that will contain the weather information for the provided city, that we will get calling a REST Connector.


    If you don’t know how to create a REST Connector check this post: Oracle Mobile Cloud Service: Create an API that calls a REST web service

    First we need to create a connector. This is the URL we are going to use:

    http://api.openweathermap.org/data/2.5/forecast/daily
    Openweathermap is a free rest api where we can get the weather forecast.

    We have to create some rules as we need to pass some parameters into the url. These are default values that we can override when calling the connector.

    The next step is to create a Custom API.
    We are going to allow annonymous calls to make it easier.

    We need an endpoint with a parameter. This enpoint will have a GET method.

    The last step is to implement our Custom API.
    Now we need to download the JavaScript Scaffold.
    At this point you need to have node.js installed (You can donwload if from this link)
    After that we need to install pdfkit module.
    Before executing ‘npm install pdfkit’ you need to be in the folder where package.json is.
    After that node_modules folder will be created.
    The next step is to edit package.json file to add the dependencies.
    We need to add pdfkit and also we have to add the connector in oracleMobile dependencies.
    PDFKit allows us to create PDF files and add text, images vector graphics, links, etc to our pdf.
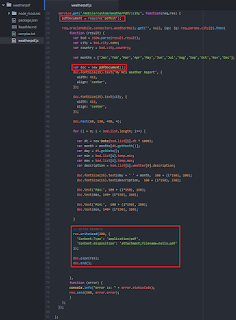
    In this example I am just creating one line (line 41) and inserting text based on the values returned by the connector.
    We cannot test the API in MCS tester as the file cannot be downloaded, but we can use postman to do it.
    We can see that the downloaded pdf contains Munich weather information for the next 3 days.

    View Post

    ADF: af:table filter modifications using a custom Query Listener

    In one of our last projects we had the requirement to allow the user to filter tables using the table filter feature. By default you can filter String fields starting with the word that the user provides, but our customer needed to find the rows that contained the criteria.

    This is an easy task that can be accomplished by creating a custom Query Listener method.

    As by default the filter works with “Starts with” condition you will see that filtering by “tra” will give no result although departments like Administration exists.
    In this example we will use Departments table in HR schema.

    When we drag and drop to create a table and we set it to be filterable, we can see that a query listener has been created by default.

    As we need to modify the filter values we need to create ouor own query listener.
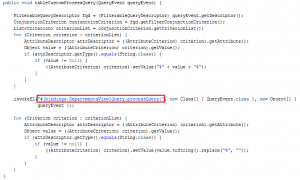
    The idea of this method is to get every value, and if it is String we have to change the original value and concatenate ‘%’ before and after the value.
    After that we need to call the default query listener that we can get from queryListener property in the table component.
    If we end here, the  user would see the new filter with % symbol, so we are going to remove it and leave it as the user type it.

    This is the helper method we use to call the default  query listener.

    The last step is to set our new method as the table’s query listener.

    If we run the application we can see that if we filter by “tra”, we can now see some records.

    View Post

    ADF: DVT Charts based on a dynamic vo

    In one of our latest projects we had the requirement to create a reporting feature that based on some filters we had to built a custom query and display those results in a chart.
    In this post I will show you the approach we followed.

    The first step is to create a dummy view object. We are going to use SELECT * FROM DUAL as its  query.

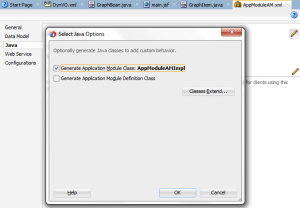
    After this we need to add this view object to our Application Module data model and also create AM implementation class.

    The main thing we are going to make is to create a List in our bean, based on a POJO that we will populate with our viewobject data.
    We are going to add 3 attributes to our java class with their getter and setter methods.

    After that, in our page’s bean we need to create a couple of properties. The first one is the List that will hold the values, and that will be the value property of the graph, and the second one is a String that will be the value property of the input where we will introduce the query.

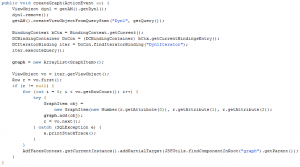
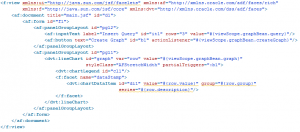
    The next method of the bean is the one to create the graph.
    The first three lines let us create the viewobject a runtime passing the query and the view object instance.

    In the rest lines of our method we are just iterating the view iterator and populating the graph List object.

    The last step is to create the page that will looks like this

    In the page definition file associated to the page we have to create the iterator binding that we are using in the bean.

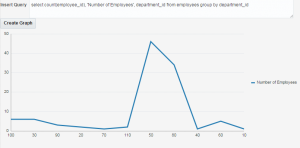
    While testing if we use this query, we will see a graph with the data.

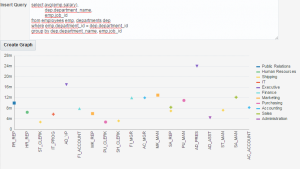
    And if we change it, the graph will change with the new query’s data.