Browse Category by ADF

ADF: Dynamic entity object attribute labels from database

In JDeveloper & ADF forums there were a question about how to set dynamic values to entity object attribute labels. Using this post of Amis I am going to show you the way we can achieve this.

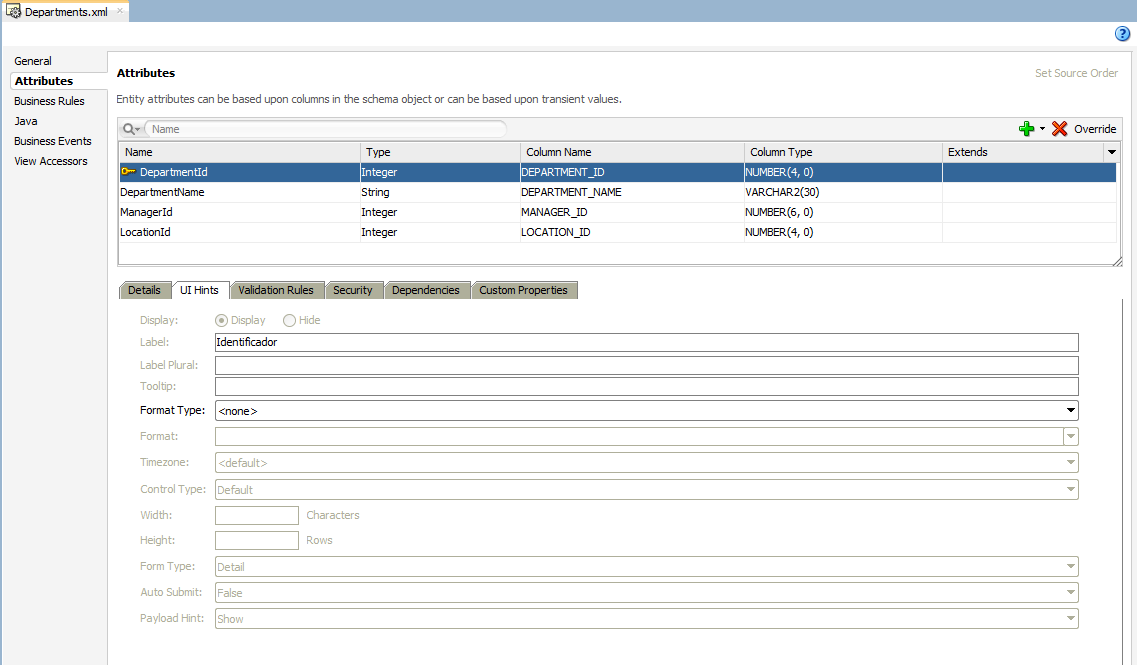
By default entity objects attributes labels are set, as you can see, for example, in Departments table in HR schema.

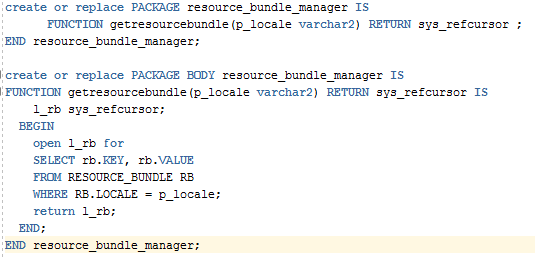
The first step is to create in our database the structure and packages we are going to use to create and store the labels.

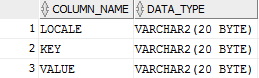
The table we have to create is “RESOURCE_BUNDLE” and is has 3 fields:

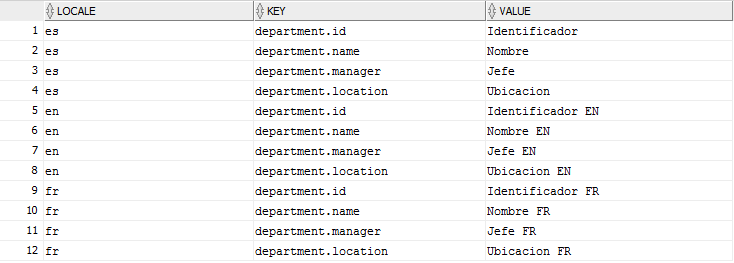
We will also add labels values for each field and locale.

We need a PL/SQL package to retrieve the labels of the selected locale.

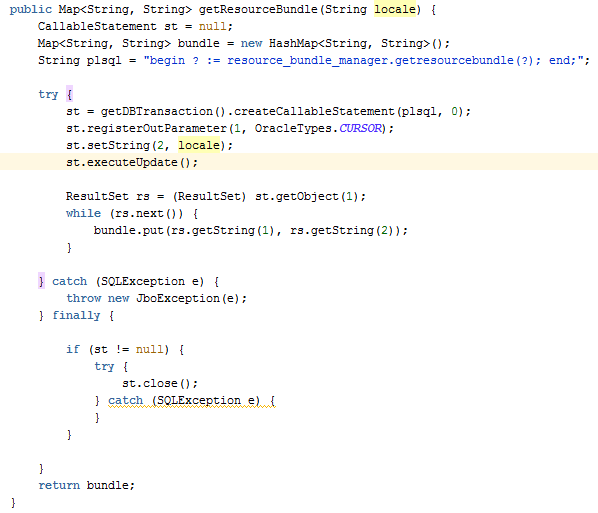
Now that we have finished to create out database needs, we have to create a method in Application Moduel Implementation class that will call the package we have previously created.

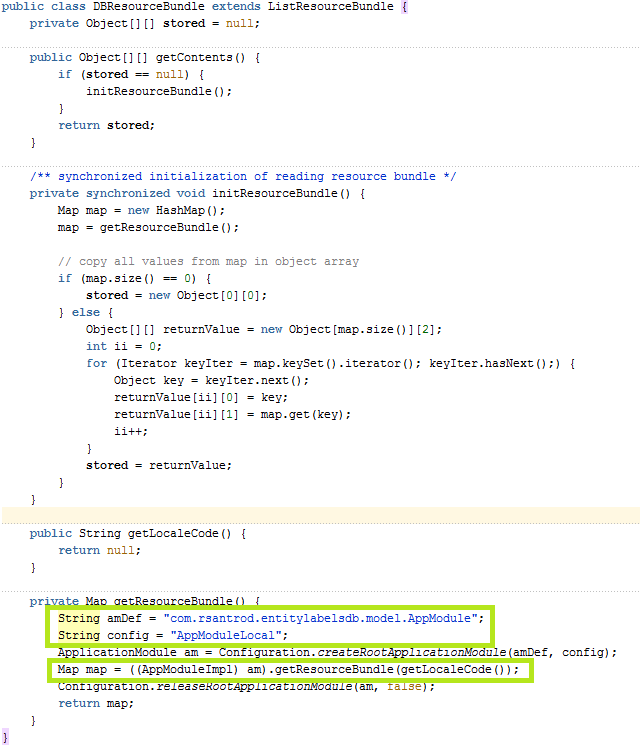
The next step is to create the Resource Bundles in our application. We are going to use Amis’ DBResourceBundle class as a start point because this class will call application module’s method to get the labels from the database.

In getResourceBundle method we have to configure amDef and config variables so we can use createRootApplicationModule method and get our Application Module.

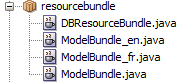
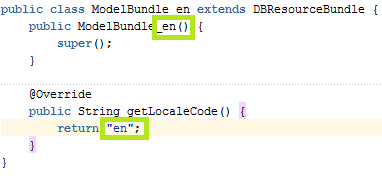
Now that we have created our base ResourceBundle, we have to create the resoruce bundles of out applications and make them extend out DBResourceBundle class. We are going to have English, Spanish and French locales.


In all the clases we are going to override getLocaleCode method where we are going to return the locale code.


The next step is to register our bundle in Model project. We have to open model project properties and select ‘Resource Bundle’ in the menu.

We have to select ‘One Bundle per Project’, fill in the bundle path without the extension and select Resource Bundle Type as ‘List Resource Bundle’.

If we have more than one bundle we can add them in ‘Bundle Search’ tab.

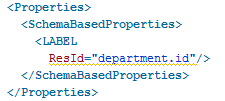
The last step is to edit attribute labels in the entity object.
Para terminar hay que modificar las etiquetas de cada uno de los atributos.
We are going to create a label so out entity object is modified with the required tags we are going to use.

If we look at the entity source code, we can see that a couple of things has been added.

The first one is the Resource Bundle we are going to use.
And the second one is the id of the label in the ResourceBundle.

We will have to add Properties tag to every attribute and edit ResId property with the key registered in the database.


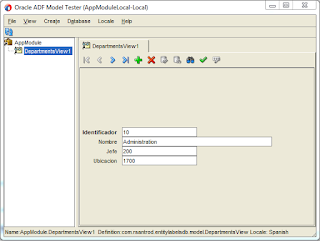
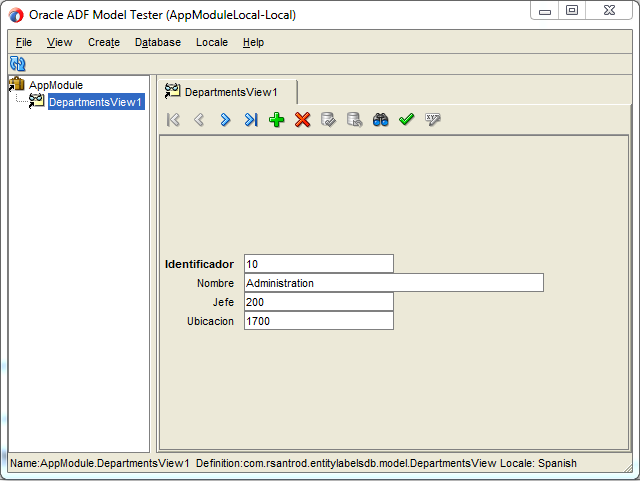
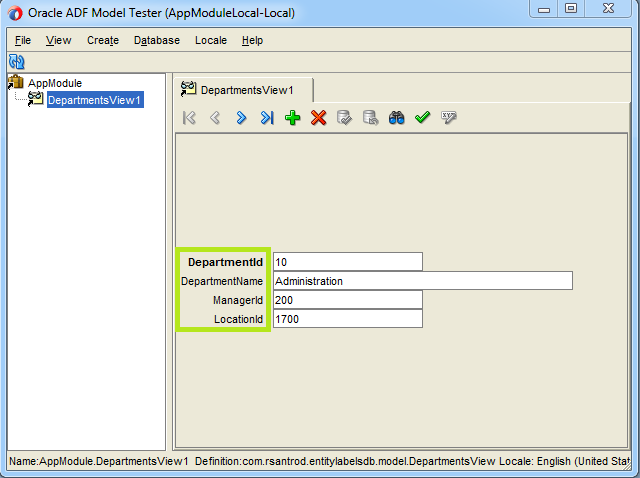
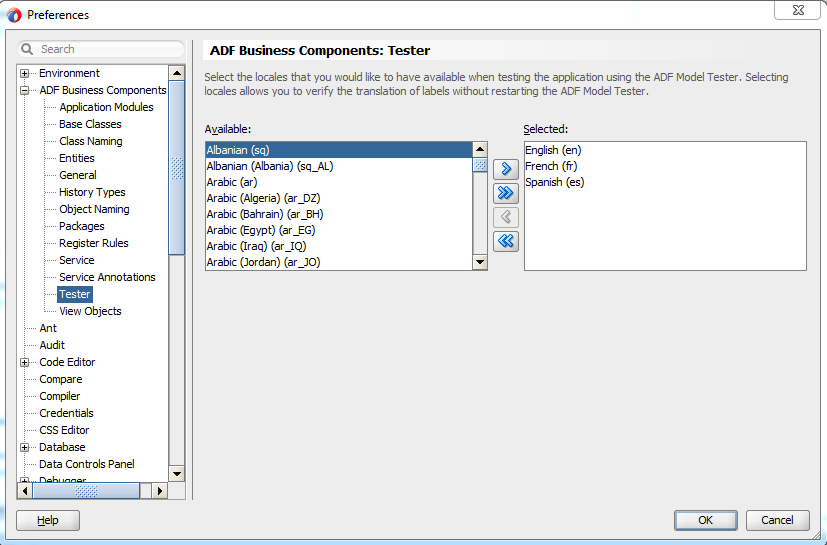
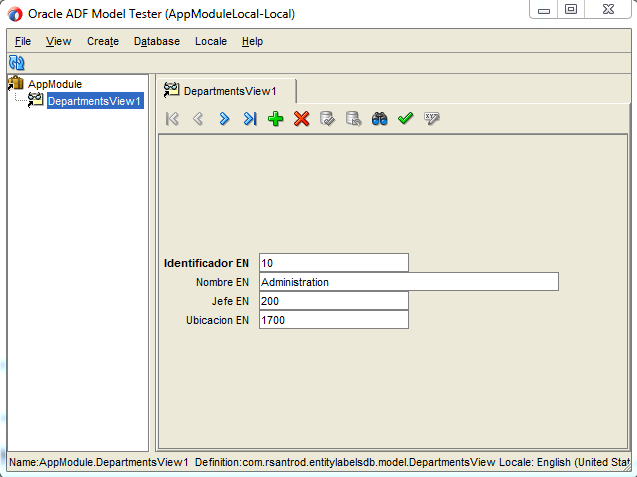
Now we are done and we have to test what we have implemented using ADF Model Tester, where we can change the locale if we activate it in JDeveloper properties.


When we run the Application Module we can see that by default English labels.

The change the locale now we have ‘Locale’ option in the menu.


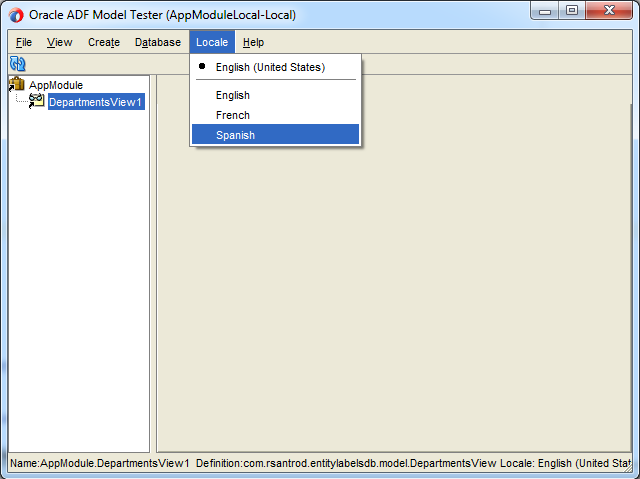
If we change the locale to Spanish and close the view, when we open it again we can see that labels are now in Spanish.


ADF: Creating and consuming JAX-RPC web services in JDeveloper 12c

As you can see in JDeveloper 12c Deprecated and Desupported features JAX-RPC has been removed from JDeveloper 12.1.2. Although it has been removed there are still many JAX-RPC web services that we need to consume so I am going to show you how to consume or create JAX-RPC web services.

Both actions require us to manually add JAX-RPC libs to the project because as you will see by default JAX-WS service and proxy are created when we try to consume or create a web service.

  • Creating JAX-RPC Web Services

By default you can only select JAX-WS web service.

To be able to create a JAX-RPC web service we need to add JAX-RPC libs to the project so in project properties we head to Libraries and Classpath and click on ‘Add library’.
Then we have to selec ‘JAX-RPC 11 Web Services’ and click ‘OK’.


Now, if we try to create the web service again we can see that the wizard don’t force us to choose JAX-WS.


  • Consuming JAX-RPC Web Services

The same happens when we try to create a JAX-RPC client proxy.

 As the error message suggest, we have to include JAX-RPC libs to the project.

 Then we can create the proxy using the wizard.

 And if we try the proxy we can see that the web service works fine.

ADF: af:tree custom context menu using selected row values

When you right click on a tree node you can see a context menu with some options like expand or collapse a node or all nodes. You can also add a custom options easily by using contextMenu facet. I am going to show you how to add a custom context menu and use selected node values in the options label.
You can download this example from my Github repository.
To create the tree structure that we will use in this example we are going to use Employees table of hr schema.
We should have this structure in the data model.
After we have our views added to the application module, we have to drag and drop EmployeesView1 from the datacontrol palette.
The next step is to add the children in the tree binding so we click on the add green button and select ‘EmployeeView’.
We are only going to use one attribute, but you can add as many as you want.
After clicking ‘Ok’ in the dialog we can add a custom contextmenu by adding a component structure like this:

If you run the application you can see ‘MenuOption 1’ in the context menu.
Now that we have our custom option in the context menu, We can try to add #{node.FirstName} in the text property os the commandMenuItem.

As you can see the new option is still in the context menu, but no name is displayed.

To achieve this we have to use a setPropertyListener with a popupFetch to store the value that we want to show in a variable.
This variable has to be at least in viewScope.
contentDelivery property of the popup has to be set to ‘lazyUncached’.

If you run the application again you can see that the option now displays the name of the selected node properly.


Update 25/09/2015; 

There is a issue while trying to open the contextual menu clicking one node while you have already have a contextual menu opened. Some times it will not open.

It can be fixed by adding contextMenuSelect=”false” in your af:tree

ADF: Add a calendar selector to inputText

There was a requirement posted in JDeveloper & ADF forums to add a calendar selector to a inputText so any text could be inserted and also a date could be selected. I am going to show you the solution I gave (Link)
You can download this example from my Github repository.

We need a inputText and a inputDate.

Next step is to set inputDate value to the inputText.

To achieve this, we have to use autoSubmit true in the inputDate and set the new value to the inputText in the valueChangeListener. We also have to set a partialTrigger so our inputText is automatically refreshed as son as the value in the inputDate is submitted.

This is the valueChangeListener that we are going to use.

In this method we have also to create a Date object and format it becasuse we would find in the inputText something like this:

Tue Jul 07 00:00:00 CEST 2015
findComponentInRoot method can be found in JSFUtils class.

At this point we already have the value in both components.

The last step is to beautify our component becasue we dot want to neither labels nor inputDate content box.
We have to add a panelLabelAndMessage surrounding both components and use simple property to hide both labels.
We have also to make add a style class to inputDate components as we don’t want to edit all inputDates style.

The last step is to make some skining so we can hide content box of the inputDate using the style class we added to the component.
If we run the application we can see our new “component” working.

ADF Skining: Defining the style of the components inside af:query

Lately, there have been a couple of questions in Oracle JDeveloper & ADF Forums about changing the style of some components. Post 1, Post 2. In both post they had the need to change the style only of one of the buttons of af:query component. As you can see in Ashish’s post, using skinning it’s possible to change the look and feel of all the buttons, but using only the default selectors it is not possible to define the look and feel only of save button.
You can download this example from my Github repository.

You can also apply this solution to other components like af:panelCollection


In CSS3 there are some selectors that allow us to conditionally define the look and feel of the components.

  • The attribute of the element contains the value: [attribute*=value]
  • The attribute of the element starts with the value : [attribute^=value]
  • The attribute of the element ends with the value: [attribute$=value]

We can apply these selectors to ADF Skinning selectors to define the styles to components that we cannot normally edit.

Having this query panel in our page, we can find the components out that we have to use to define the style to save button by inspecting the code generated using your favorite browser.

If we search the save button we can see that this button is generated as a div with the id qryId1:_search. This id is generated with the id of the af:query component and the name fo the button’s action.


As we have now the attribute and the value to use we are going to use one of the CSS3 selectors I mentioned before.
The selector that fits better in our requirement is “end with” selector using the value ‘_search’.

If we run the application again we can see that save button now has red text.