Browse Category by ADF

ADF: Display current selected node in af:tree

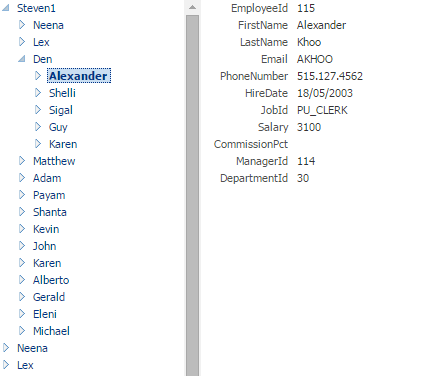
Some times when we want to display some master detail data we use an af:tree because it is a easy and elegant way to display data. I am going to show you how to display data of the selected node in an af:tree based on a single view object.
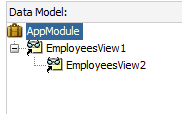
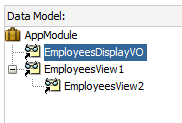
We are going to use this data model based on Oracle hr schema.
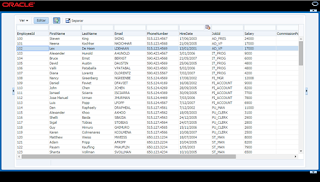
The first thing we have to do is drag and drop the EmployeesView1 view object from the data control palette to the page.

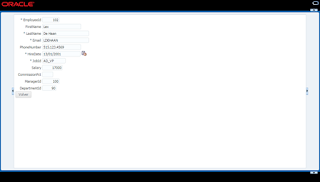
After that we also have to add a form based on EmployeesView. Here is the problem. What view object instance are we going to use to create the form? If we use Parent instance, although we select a child node, in the form we are going to see just the parent node data.

In order to solve this issue we are going to create a new instance of the Employees view object, in this case EmployeesDisplayVO.

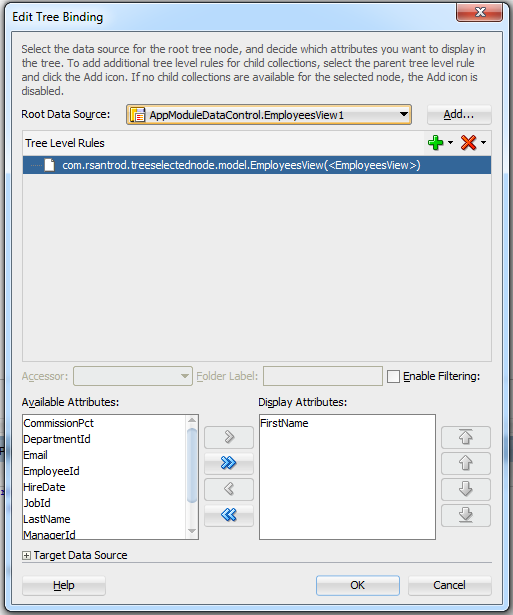
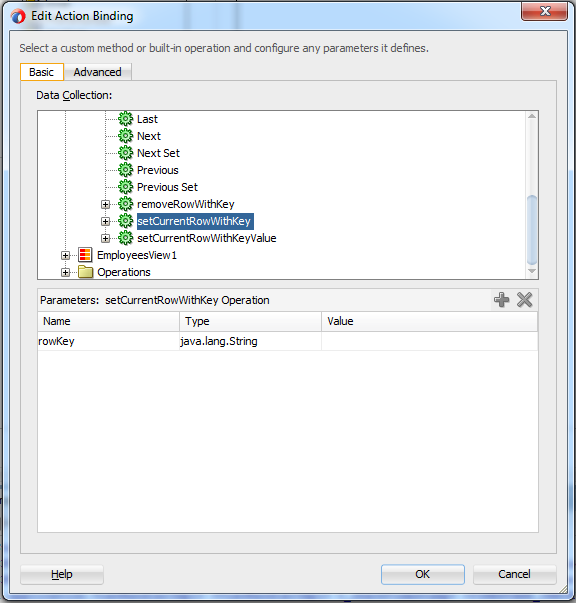
The next step is to create a Action Binding with setCurrentRowWithKey operation of the new view object instance in the pagedef of our page.

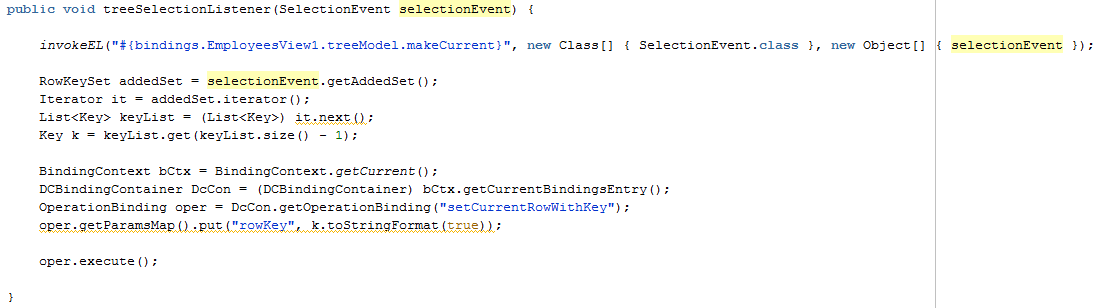
The last step is to create a custom Selection Listener in our bean and associate it to the af:tree
component.

In this method, a part from ejecute makeCurrent method of the treeModel, we are going to get selected keys and execute setCurrentRowWithKey method with the selected key as parameter.

When we select the first node only one key is in the list, but if we select the second or third level we will have one key per level and we will have to use keyList.get(keyList.size() – 1) in order to get the last selected key.

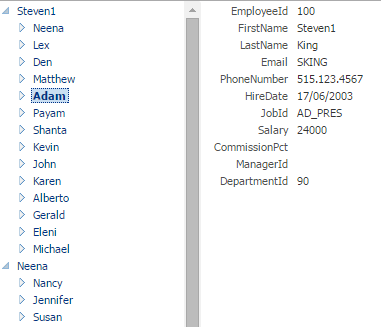
If we run again the application we can se that if we select any node we can see its information in the form.

ADF: Default value when editing a row

Recently one of our customers had a need to assign a default value to a field only when editing a row. This tip show you how to achieve this behavior.

Let’s assume we have a simple task flow, as shown below:

In the first fragment we have an af:table based on Employees table in hr schema.

And in the second fragment we have a form based on the same view where we can edit selected row.


The goal is to set a different value to Email attribute when we navigate to the form. To achieve it we have to generate View Row Class in EmployeesVO.
In EmployeesVO inside ‘Java’ tab we have to click on ‘Java Classes’ edit pencil and check ‘Generate View Row Class EmployeesViewRowImpl’

Once the class is created we have add a method that will set the value to Email field.

as we want to add that field to the taskflow we need to have it published by editing Client Row Interface.

Now we can drag our method from datacontrols palette and drop it in the taskflow.


If we run again the app, select a row and click on edit button, once the form fragments appears we can see that Email field value has changed.


ADF 12.2.1: Using the Theme Editor

A couple of weeks ago Oracle released ADF 12.2.1 with many cool features and one of them is the Theme Editor. With this new tool you can change the look and feel of you application by selecting the desired style of the components and see the changes automatically right in the browser. This tool can help developers who are not experts in CSS to build applications with a great look and feel.

We have to make a couple of things in order to use the theme editor.
First we have to create a new application based on an existing EAR file.

The EAR file we are going to use is located inside our 12.2.1 Middleware Home, in my installation this path is:

After that we just have to click on Finish to create the skin editor application.
To start the Theme Editor we have to run that application by runing index.html file.

Once the application is runing we will see this:

We are going to create a new skin so we have to click on ‘Create Theme’ button. A popup will appear where we have to put the name of the theme and also select the skin we want to use. We can choose Skyros or Alta as our base skin.

Click on ‘Save and Close’ and we will have our theme created. By clicking on the right button we can for example edit, delete, duplicate or export our theme. We will come back later to export the theme but at the moment we are going to edit it.
Once you click on edit, we can see some tabs in the top of the page where wecan change property values of some components, and in the bottom of the page we have a real time preview of our skin.
A quick example of what can we do is change our buttons style.

When we have finished our skin work we have to click ok ‘Save and Close’ in the top right of the page.
Now we can use this skin in our application by exporting the theme.
After exporting the skin we can use it by importing the jar file we have just generated in our application.
We also have to select this skin as default skin by selecting it as ‘Default Skin Family’ in ‘ADF View’ menu in project proeprties.

Now if we run the application we can see that the skin that we applied in the theme editor applies to our application.
If we don’t get the look and feel that we expected using the Theme Editor we can also extend the skin we have just created and add our custom CSS rules to skin our application.
You can get more information about the Theme Editor and about using skins in an ADF Library JAR file in these links:

ADF: Styling components by its id

If we want to change the style of a component we usually use skinning and its selectors or we use the styleClass property of the components and creating a class in the css file.

Although it is not a usual way to apply styles to a component I am going to show you how to style any component using its id.
If we have a button for example in a page and it is not surrounded by any naming container, for example a panelCollection or a region we can use its id to style the component
Look at button “b1” and its style.

As soon as that component in surrounded by any naming container the id generated in html will change, and for example it will be “pc1:b2” if we have it in a panelCollection, or “r1:0:b1” if we have it in a region.

You can check the code generated by inspecting the page once you run it.

If we try to use the new id “pc1:b2” you will see that button’s style has not changed.

In CSS we have some special characters like these ones.

$, %, &, !, “, #, ‘, (, ), *, :, ;,<, =, >, +, ,, -, ., /, ?, @, [, , ], ^, `, {, |, }, ~
The way to fix it is to scape the special characters. To do this we have to look at the unicode table and look for the character 
In this example the unicode value for ‘:’ is ‘3a’.
Once we have the unicode value for our character we have to replace ‘:’ by ‘3a ‘.

Don’t forget to add a space after the unicode value.

Now if we run the application we can see that the button’s style has changed.

It has been a long wait, but ADF 12.2.1 has been released

One year and a half after the last Oracle ADF 12c version (12.1.3), last Friday Oracle released Oracle ADF 12.2.1. This release is part of a major Oracle Fusion Middleware release, including WebLogic Server 12c, SOA 12c and WebCenter 12c.
If you want to use MAF you will still have to use JDeveloper 12.1.3.

As we were so much time without a new release, Oracle ADF 12.2.1 brings us lots of new features and also a lot of bugs fixed. These are some of them:

  • Java SE 8

JDeveloper 12.2.1 runs on JDK8 and provides development support for JDK8.

  • JCS and DCS integration

We are now able to integrate JDeveloper with Java Cloud Service and Developer Cloud Service.

  • Alta Skin

Alta UI is not a new feature, but this is the new default skin in every ADF application instead of Skyros. There is also a new Oracle Alta UI website where you can find some advices and a demo.

  • Theme Editor

We also have a new feature that will help developers who don’t have a lot of knowledge in CSS to build and edit a skin.

  • Masonry Layout

Masonry Layout help us to build responsive pages that will automatically adjust its children to fit the available space. There is also a new three columns responsive template.

  • DVT components iimprovements

Some components that were already available have been improved such as Funnels and Pie Charts. Polar coordinate system is also now supported by some types such as bar, line, bubble, etc.

We have also a new component ‘NBox’ that is usually used to compare data across two dimensions, for example to compare employees performance.


If you want to know more about the new version, the full list of improvements or know all the bugs that has been fixed click on this link.